Chapters
Baby Steps
Before we jump into the moderately deep end its worth noting that there are 2 simpler ways of creating async tasks:
- Make a
UFUNCTIONwith Latent and LatentInfo metadata specifiers and usingFLatentActionManagerto create a latent action. - Subclass
UBlueprintAsyncActionBase.
If you are just interested in creating an async/latent task then those should be your first options, in this order. Both have their pros and cons, neither of which are covered in this article.
But Why?
While the 2 options above will generate a Blueprint node for you, subclassing UK2Node_BaseAsyncTask gives you full control over the generated node. This includes control over how and what pins are generated, how the node is expanded, or a use a custom widget for the node, which can greatly improve the usability of complex nodes.
Latentcy
If you have used Blueprints for any amount of time you have almost certainly come across so-called “Latent” nodes which are denoted by a clock face in the top right corner. These latent nodes don’t continue execution immediately but some time later on. In the case of the “Delay” node, execution continues after the specified “Duration” parameter.
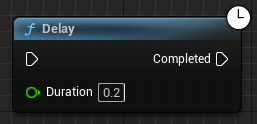
If you look at this Delay node and think “I would love to know how to make one of these” then let this article curb that enthusiam for you.
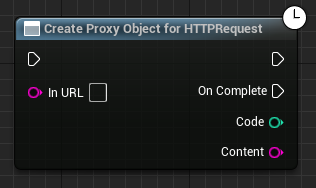
In this article we are going to implement a K2 node that does an HTTP Get request.
The foundation of this behavior is in UK2Node_BaseAsyncTask, which is arguable the easiest K2 node to subclass. You give it a factory function name, factory class, and a proxy class and it will give you a node that has input and output execution pins, and an output execution pin for each dynamic multicast delegate.
Latent vs Async
Latent and Async are both used to describe a task that can execute in a non-blocking way. While the terms are interchangeable when it comes to K2 nodes, latent is primarily used in Blueprints and async is primarily used in C++.
Subclassing UK2Node_BaseAsyncTask
As mentioned above, UK2Node_BaseAsyncTask is probably the easiest way to make a K2 node. Internally it handles pin allocation, node expansion, gives us the clock face icon denoting its latent, puts our node in the proper category in the actions menu, and even implements GetMenuActions for us.
The only 2 things we need in order to make an asyc node is to make a “proxy” class (which is created by the K2 node and actually does runtime stuff) and to subclass UK2Node_BaseAsyncTask (so we can pass in our proxy class).
Proxy Class
The proxy class is a UObject that holds dynamic multicast delegates plus whatever other data and functions your node needs to actually do anything.
The proxy class for our HTTP Get request is pretty simple. We need a factory function to create our proxy object, the url for the request, and a delegate for when the request is done.
The name of the factory function is what UK2Node_BaseAsyncTask uses to name our node and can be overwritten using the DisplayName meta attribute.
#pragma once

#include "UObject/Object.h"

#include "HttpReqProxy.generated.h"

DECLARE_DYNAMIC_MULTICAST_DELEGATE(FSimpleMCDelegate);

UCLASS(MinimalAPI)
class UHttpReqProxy : public UObject
{
	GENERATED_BODY()

public:
	UPROPERTY()
	FString URL;

	UPROPERTY(BlueprintAssignable)
	FSimpleMCDelegate OnComplete;

	UFUNCTION(BlueprintCallable, meta = (BlueprintInternalUseOnly = "true"))
	static UHttpReqProxy* CreateProxyObjectForHTTPRequest();
};The source for this is just the implementation of CreateProxyObjectForHTTPRequest. We use the RF_StrongRefOnFrame flag to stop shiny new proxy object getting garbage collected since we don’t store our proxy object anywhere.
Using RF_StrongRefOnFrame on the proxy object is noted in the engine source
// Copyright Epic Games, Inc. All Rights Reserved.
...
/** !!! The proxy object should have RF_StrongRefOnFrame flag. !!! */

UCLASS(Abstract)
class BLUEPRINTGRAPH_API UK2Node_BaseAsyncTask : public UK2Node
...#include "HttpReqProxy.h"
UHttpReqProxy* UHttpReqProxy::CreateProxyObjectForHTTPRequest()
{
auto* proxy = NewObject<ThisClass>();
proxy->SetFlags(RF_StrongRefOnFrame);
return proxy;
}Subclass
As mentioned above the only thing we need to do is provide our proxy function and class to UK2Node_BaseAsyncTask in the constructor and thats the entire K2 node done.
#pragma once

#include "K2Node_BaseAsyncTask.h"

#include "K2Node_HttpReq.generated.h"

UCLASS()
class UK2Node_HttpReq : public UK2Node_BaseAsyncTask
{
	GENERATED_BODY()

public:
	UK2Node_HttpReq(const FObjectInitializer& ObjectInitializer);
};#include "K2Node_HttpReq.h"
#include "HttpReqProxy.h"
UK2Node_HttpReq::UK2Node_HttpReq(const FObjectInitializer& ObjectInitializer)
: Super(ObjectInitializer)
{
ProxyFactoryFunctionName = GET_FUNCTION_NAME_CHECKED(UHttpReqProxy, CreateProxyObjectForHTTPRequest);
ProxyFactoryClass = UHttpReqProxy::StaticClass();
ProxyClass = UHttpReqProxy::StaticClass();
}And just like that we have a nonfunctional async/latent node, which was significantly easier to get in the graph than a regular K2 node.

Something doesn’t look quite right. In our UHttpReqProxy class we have a data member: FString URL. There are no pins on the node for this input, so lets fix that.
Data In, Data Out
In order to get data in and out of our node we need to make full use of our factory function CreateProxyObjectForHTTPRequest. UK2Node_BaseAsyncTask automatically uses the parameters of our CreateProxyObjectForHTTPRequest function to generate the pins. To get our URL pin showing on the node we just need to add it as an input to the factory function.
static UHttpReqProxy* CreateProxyObjectForHTTPRequest(FString InURL)UHttpReqProxy* UHttpReqProxy::CreateProxyObjectForHTTPRequest(FString InURL)
{
auto* proxy = NewObject<ThisClass>();
proxy->SetFlags(RF_StrongRefOnFrame);
proxy->URL = InURL;
return proxy;
}
We can extend this behavior to our delegate too. If we add parameters to our delegate they will be added as output execution pins automatically. If we have multiple delegates with the same signature, the data pins will be shared between the delegate’s execution pins.
Expansion
Let’s compile a Blueprint with our node and see what gets created.
First a function call to our factory function is made and then, for each of our delegates, a custom event is created and bound to.
Metadata
UK2Node_BaseAsyncTask uses 2 metadata tags on the proxy class to control extra functionality within the node:
ExposedAsyncProxywill add an extra pin for the created proxy object namedAsyncTaskProxywhich can be overwritten by giving a value (meta = (ExposedAsyncProxy = "My Proxy Object")).HideThenwill not create athenpin on the node meaning that the only output execution pins will be for the delegates.
HTTP Request
I almost forgot to actually implement a get request for our node, so lets get that sorted. We need to add the HTTP module to our {Project}.build.cs and make a new Get request. We bind a lambda to the OnProcessRequestComplete delegate to check that the HTTP response code is good and then broadcast our OnComplete delegate.
#include "HttpReqProxy.h"

#include "HttpModule.h"
#include "Interfaces/IHttpRequest.h"
#include "Interfaces/IHttpResponse.h"

UHttpReqProxy* UHttpReqProxy::CreateProxyObjectForHTTPRequest(FString InURL)
{
	auto* proxy = NewObject<ThisClass>();
	proxy->SetFlags(RF_StrongRefOnFrame);
	proxy->URL = InURL;

	FHttpRequestRef req = FHttpModule::Get().CreateRequest();
	req->SetURL(InURL);
	req->SetVerb("GET");
	req->OnProcessRequestComplete().BindLambda([proxy](FHttpRequestPtr InRequest, FHttpResponsePtr InResponse, bool InConnectedSuccessfully)
	{
			if (InResponse->GetResponseCode() < 400 && InConnectedSuccessfully)
			{
				proxy->OnComplete.Broadcast();
			}
			else
			{
				UE_LOG(LogTemp, Warning, TEXT("HTTP GET (%s) failed with code %d"), *proxy->URL, InResponse->GetResponseCode());
			}
	});
	req->ProcessRequest();

	return proxy;
}
Wrapping Up
As mentioned twice now, UK2Node_BaseAsyncTask is really easy to get off the ground as it does a ton of the leg work for you.
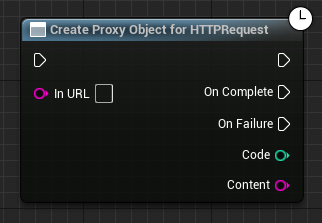
I left out 2 parts of the HTTP request: a failure delegate, and content pin (which I’ll leave as an exercise for the viewer).
There are some cases where UK2Node_BaseAsyncTask are not suitable such as delegates which you want hidden, multiple delegates with different signatures, or you don’t want to use a proxy UObject. If these limitations are a concern, studying the UK2Node_BaseAsyncTask source should give you all the answers you need.
If you made it this far with your sanity in tact: congratulations! I hope you’ve learnt something about K2 nodes.
The full code and working Unreal Engine 5 project for this article is available here.
Special thanks to Daekesh for taking the time to proof this article.