Chapters
- Before we get started
- The K2 Node
- Allocating Pins
- Node Expansion
- Finishing Touches
- Examining Intermediates
- Wrapping Up
In this article we are going to be implementing a custom K2 node. The node is going to provide print functionality identical to the existing Print String blueprint node with the addition of verbosity like you would find in UE_LOG.
Before we get started
It’s important to know that K2 nodes are only allowed in editor modules, not runtime modules. When a blueprint is compiled that contains your custom K2 node, ExpandNode is called and the result will be serialized as bytecode.If your project already contains an editor module you can use, feel free to skip the next section.
Creating an Editor Module
Below are the files and contents you will need for your editor module. For more details on how to set up editor modules, read this link
using UnrealBuildTool;
using System.Collections.Generic;

public class {Project}EditorTarget : TargetRules
{
    public {Project}EditorTarget( TargetInfo Target) : base(Target)
    {
        Type = TargetType.Editor;
        DefaultBuildSettings = BuildSettingsVersion.V2;
        IncludeOrderVersion = EngineIncludeOrderVersion.Latest;
        ExtraModuleNames.AddRange(new string[] { "{Project}", "{Project}Editor" });
    }
}using UnrealBuildTool;
public class {Project}Editor : ModuleRules
{
public {Project}Editor(ReadOnlyTargetRules Target) : base(Target)
{
PCHUsage = PCHUsageMode.UseExplicitOrSharedPCHs;
OverridePackageType = PackageOverrideType.GameUncookedOnly;
PublicDependencyModuleNames.AddRange(new string[] { "Core", "CoreUObject", "Engine", "InputCore" });
PrivateDependencyModuleNames.AddRange(new string[] {
"{Project}",
"BlueprintGraph",
"KismetCompiler",
"UnrealEd"
});
}
}#include "Modules/ModuleManager.h"
IMPLEMENT_MODULE(FDefaultModuleImpl, {Project}Editor);The K2 Node
Now that we have a suitable editor module to use, we can make the node. The class stub itself is pretty simple, so here it is.
#pragma once

#include "K2Node.h"

#include "K2Node_Print.generated.h"

UCLASS()
class UK2Node_Print : public UK2Node
{
    GENERATED_BODY()

public:
#pragma region UEdGraphNode
    virtual void AllocateDefaultPins() override;
    virtual FLinearColor GetNodeTitleColor() const override { return FLinearColor(1.0f, 0.1f, 1.0f); }
    virtual FText GetNodeTitle(ENodeTitleType::Type TitleType) const override { return FText::FromString("Print with Verbosity"); }
    virtual void ExpandNode(class FKismetCompilerContext& CompilerContext, UEdGraph* SourceGraph) override;
#pragma endregion // UEdGraphNode

#pragma region UK2Node
    virtual void GetMenuActions(class FBlueprintActionDatabaseRegistrar& ActionRegistrar) const override;
#pragma endregion // UK2Node
};#include "K2Node_Print.h"
#include "BlueprintNodeSpawner.h"
#include "BlueprintActionDatabaseRegistrar.h"
#include "KismetCompiler.h"
void UK2Node_Print::AllocateDefaultPins()
{
// Stub we implement later
}
void UK2Node_Print::ExpandNode(FKismetCompilerContext& CompilerContext, UEdGraph* SourceGraph)
{
Super::ExpandNode(CompilerContext, SourceGraph);
// Stub we implement later
}
void UK2Node_Print::GetMenuActions(class FBlueprintActionDatabaseRegistrar& ActionRegistrar) const
{
UClass* ActionKey = GetClass();
if (ActionRegistrar.IsOpenForRegistration(ActionKey))
{
UBlueprintNodeSpawner* NodeSpawner = UBlueprintNodeSpawner::Create(GetClass());
check(NodeSpawner != nullptr);
ActionRegistrar.AddBlueprintAction(ActionKey, NodeSpawner);
}
}Theres a little bit to unpack here. We found out in the previous article what AllocateDefaultPinsand ExpandNode do, so lets cover some of the new functions here.
GetNodeTitleColor
As the function name suggests, this function is responsible for coloring the node. FLinearColor is normalized so 0 is black and 1 is white. For this node, we are going with a nice hot pink color.
GetNodeTitle
Another self-explanatory function, it sets the title of the node in the graph. You can expand this function further by using the provided TitleType, so you can display a different name in the right-click menu for example. This is how the Reroute Node works.
// Copyright Epic Games, Inc. All Rights Reserved.
FText UK2Node_Knot::GetNodeTitle(ENodeTitleType::Type TitleType) const
{
    if (TitleType == ENodeTitleType::EditableTitle)
    {
        return FText::FromString(NodeComment);
    }
    else if (TitleType == ENodeTitleType::MenuTitle)
    {
        return LOCTEXT("KnotListTitle", "Add Reroute Node...");
    }
    else
    {
        return LOCTEXT("KnotTitle", "Reroute Node");
    }
}GetMenuActions
This function is responsible for actually displaying your node in the right-click menu (Actions Menu) and making it spawn into the blueprint graph when you select it. The implementation shown is the minimum you need to get your node showing up in the Actions Menu and spawning it into the graph. Why this isnt the default implementation in UK2Node we will never know.
Out first node
Thats the basic implementation for our first K2 node. It does absolutely nothing but its ours and we made it.
Allocating Pins
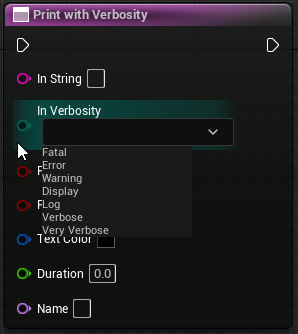
You might look at our node and realise that it looks weird; it’s missing pins. The Print String node has a total of 8 pins: 2 execution pins, 1 string pin, 2 boolean pins, 1 linear color pin, 1 float pin, and 1 name pin. In order for our node to even come close to the usefulness of Print String, we will need to have at least those 8 pins with another pin for verbosity.
To create a pin all we need to do is call CreatePin, however if we call this function wherever we want, it might not behave how we want or expect. AllocateDefaultPins will ensure that the pin exists when the pin is re/created which is what we want in this case. CreatePin takes at least 3 parameters:
- Direction: Input or output (
EGPD_Input/EGPD_Output) - Category: Pin category of the pin (eg boolean, float, name, string, object, etc) (
UEdGraphSchema_K2::PC_*) - Name: The name of this pin. Does not need to be unique but its a good idea. Unreal supplies some common names for pins with
UEdGraphSchema_K2::PN_*
Print String Pins
Now that we know what parameters we need to create a pin, lets take a look at Print String and add a CreatePin call for each:
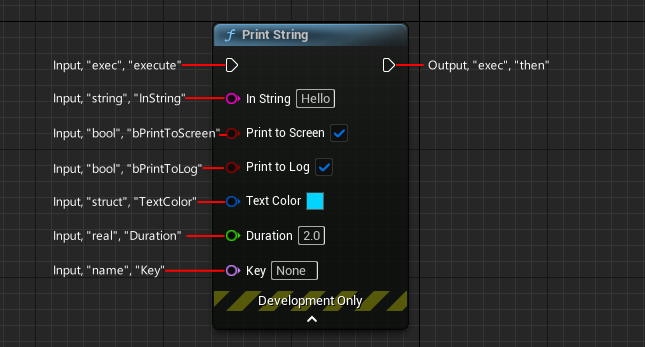
void UK2Node_Print::AllocateDefaultPins()
{
    CreatePin(EGPD_Input, UEdGraphSchema_K2::PC_Exec, UEdGraphSchema_K2::PN_Execute);
    CreatePin(EGPD_Output, UEdGraphSchema_K2::PC_Exec, UEdGraphSchema_K2::PN_Then);

    CreatePin(EGPD_Input, UEdGraphSchema_K2::PC_String, "InString");
    CreatePin(EGPD_Input, UEdGraphSchema_K2::PC_Boolean, "bPrintToScreen");
    CreatePin(EGPD_Input, UEdGraphSchema_K2::PC_Boolean, "bPrintToLog");
    CreatePin(EGPD_Input, UEdGraphSchema_K2::PC_Struct, TBaseStructure<FLinearColor>::Get(), "TextColor");
    CreatePin(EGPD_Input, UEdGraphSchema_K2::PC_Real, "Duration");
    CreatePin(EGPD_Input, UEdGraphSchema_K2::PC_Name, "Key");
}CreatePin extra parameter
Earlier I said that CreatePin takes at least 3 parameters yet for TextColor we have 4 parameters: Direction, Category, PinSubCategoryObject, and Name. For primitive blueprint types such as integer, bool, and float the PinSubCategoryObject parameter is not needed. In fact it’s technically not even needed for complex types like enum, struct, and object. This additional parameter is called PinSubCategoryObject which essentially tells the pin which type of the category we are after. In the case of PC_Struct, we tell the pin which struct we want to accept. If we did not provide a subcategory object for TextColor the pin would accept any struct type which is not what we want.
Verbosity Pin
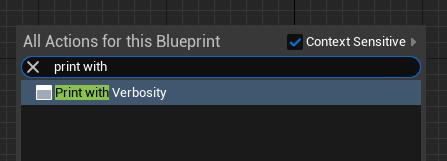
Our new node looks good but its missing a pin for verbosity; the entire reason we are making this node in the first place. Should be simple enough right?
Yes, sort of. The problem with this particular case is that the enum we would use for verbosity (ELogVerbosity) is not exposed to blueprints, so we need to make our own enum which we will manually map to ELogVerbosity with a switch statement later on. Simple, right?
If we take a look at ELogVerbosity we will find all the verbosities we need. For simplicity, we will use only the valid verbosities in ours:
UENUM()
enum class EPrintLogVerbosity: uint8
{
    Fatal,
    Error,
    Warning,
    Display,
    Log,
    Verbose,
    VeryVerbose
};Now all that’s left is to add a pin to our node, similar to how we added the TextColor pin:
void UK2Node_Print::AllocateDefaultPins()
{
    CreatePin(EGPD_Input, UEdGraphSchema_K2::PC_Exec, UEdGraphSchema_K2::PN_Execute);
    CreatePin(EGPD_Output, UEdGraphSchema_K2::PC_Exec, UEdGraphSchema_K2::PN_Then);

    CreatePin(EGPD_Input, UEdGraphSchema_K2::PC_String, "InString");
    CreatePin(EGPD_Input, UEdGraphSchema_K2::PC_Byte, StaticEnum<EPrintLogVerbosity>(), "InVerbosity"); //<-- Our shiny new verbosity pin
    CreatePin(EGPD_Input, UEdGraphSchema_K2::PC_Boolean, "bPrintToScreen");
    CreatePin(EGPD_Input, UEdGraphSchema_K2::PC_Boolean, "bPrintToLog");
    CreatePin(EGPD_Input, UEdGraphSchema_K2::PC_Struct, TBaseStructure<FLinearColor>::Get(), "TextColor");
    CreatePin(EGPD_Input, UEdGraphSchema_K2::PC_Real, "Duration");
    CreatePin(EGPD_Input, UEdGraphSchema_K2::PC_Name, "Key");
}PC_Real vs PC_Float/PC_Double and PC_Byte vs PC_Enum
If you have done a bit of research on the pin categories, you are probably wondering why we are using PC_Byte instead of PC_Enum for our enum pin and PC_Real instead of PC_Float or PC_Double for the duration pin. The simple answer is that PC_Enum, PC_Float, and PC_Double do nothing. FNodeFactory::CreateK2PinWidget simply does not create the expected pin types given those categories so you end up with a generic SGraphPin which is unusable.
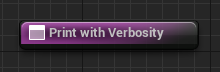
Just like that we have a neat looking Print String with Verbosity node that looks like it does what it says:
Node Expansion
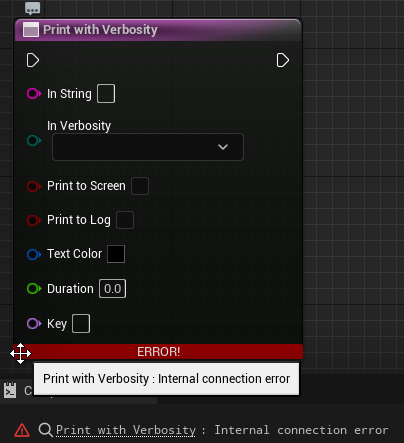
Now that we have a node that looks like it does something, let’s actually make it do something. If you try to compile the blueprint right now, you will be greeted with this:

This is telling us that our node internally is not wired to anything, but dont worry we will fix this.
A Function to Call Home
To start, we need to create a function which we will call from blueprints. This might sound counter-intuitive since ExpandNode is a C++ function so why can’t we call this function from C++? Unfortunately for us, ExpandNode is only called once at compile time. The K2 node (and therefore ExpandNode) does not exist at runtime so we need to convert what would be a simple C++ function call into a complex set of intermediate nodes that calls this C++ function from blueprints.
The function is the mostly the same as any other UFUNCTION and needs to be in a runtime module (e.g. your game module) not an editor module.
UFUNCTION(BlueprintCallable, meta = (BlueprintInternalUseOnly = "true"))
void PrintWithVerbosity(const FString& InString, EPrintLogVerbosity InVerbosity, bool bPrintToScreen, bool bPrintToLog, FLinearColor TextColor, float Duration, FName Key) {};
We need BlueprintCallable so that we can create the actual function call in blueprint and BlueprintInternalUseOnly makes it so this node will not show up in the normal blueprint graph. Benui has a great site that documents all the UFUNCTION and other U-Macro parameters which you can check out here.
Right now your IDE is probably yelling at you because it doesnt know what EPrintLogVerbosity is. The fix for this is straight forward: we need to move the definition of EPrintLogVerbosity into the runtime module so that our function can access it. Since this function is the only place we need it I have moved the definition into the same file as the UFUNCTION. Now that EPrintLogVerbosity has moved, our editor module no longer knows about it so to fix it we simply need to include the new location of EPrintLogVerbosity in K2Node_Print.hpp and make sure that {Project}Editor.build.cs has {Project} in either public or private dependencies.
Implementation
Due to UE_LOG being a macro and UE_LOGFMT using verbosity as a template parameter the implementation for PrintWithVerbosity is going to be a … less than desirable but it will work. We basically need to switch on InVerbosity and make calls to UE_LOG for each case passing in the other parameters.
#define ADD_VERBOSITY_CASE(Verbosity) case EPrintLogVerbosity::Verbosity: UE_LOG(LogBlueprintUserMessages, Verbosity, TEXT("%s"), *InString); break;
void UPrintBPFL::PrintWithVerbosity(const FString& InString, EPrintLogVerbosity InVerbosity, bool bPrintToScreen, bool bPrintToLog, FLinearColor TextColor, float Duration, FName Key)
{
    if (bPrintToLog)
    {
        switch (InVerbosity)
        {
            ADD_VERBOSITY_CASE(Fatal);
            ADD_VERBOSITY_CASE(Error);
            ADD_VERBOSITY_CASE(Warning);
            ADD_VERBOSITY_CASE(Display);
            ADD_VERBOSITY_CASE(Log);
            ADD_VERBOSITY_CASE(Verbose);
            ADD_VERBOSITY_CASE(VeryVerbose);

        default:
            checkNoEntry();
            break;
        }
    }

    if (bPrintToLog)
    {
        uint64 InnerKey = (Key != NAME_None) ? GetTypeHash(Key) : - 1;
        GEngine->AddOnScreenDebugMessage(InnerKey, Duration, TextColor.ToFColor(true), InString);
    }
}
#undef ADD_VERBOSITY_CASE
ExpandNode
The final thing to do is write the implementation for K2Node_Print::ExpandNode. Most K2 node expansion is done using intermediate nodes which are basically just other K2 nodes that make up your K2 node. Each of these K2 nodes will have their own ExpandNode function which will either use more K2 nodes or will output direct BPVM instructions. For K2Node_Print, will be using a single UK2Node_CallFunction intermediate node and moving the pins from our node to the appropriate pins on the UK2Node_CallFunction node.
Intermediate nodes are created using FKismetCompilerContext::SpawnIntermediateNode which is templated so you provide the type of node you want along with the this as the source node (i.e. the node that owns the intermediate node) and source graph parameter provided in ExpandNode.
UK2Node_CallFunction also needs to know which function we want to call which is done by calling UK2Node_CallFunction::FunctionReference::SetExternalMember then calling AllocateDefaultPins so we get a pin for each function parameter.
auto* FuncCallNode = CompilerContext.SpawnIntermediateNode<UK2Node_CallFunction>(this, SourceGraph);
const FName CommandFuncName = GET_FUNCTION_NAME_CHECKED(UPrintBPFL, PrintWithVerbosity);
FuncCallNode->FunctionReference.SetExternalMember(CommandFuncName, UPrintBPFL::StaticClass());
FuncCallNode->AllocateDefaultPins();
Now that we have our intermediate node that will actually call the function we need to wire it up. This is the most tedious and error prone part since you will need to keep track of what pins are supposed to be connected to what. For our simple 1-intermediate-node this is trivial. Pin wiring is done using 2 functions:
FKismetCompilerContext::MovePinLinksToIntermediatewhich will move all pin connections fromPinAtoPinBfor use with pins with the same direction.UEdGraphSchema::TryCreateConnectionused to create a new connection between 2 pins of opposing directions.
We will only be using MovePinLinksToIntermediate which is mostly used for moving pin connections from our K2 node pins to our intermediate node pins and we will need to call this function for both exec pins plus all function inputs. In order to use it we need to give it UEdGraphPin& which we need to get using one of the FindPin functions to find each pin on UK2Node_Print and UK2Node_CallFunction by name. I would recommend using FindPinChecked unless you either don’t care or handle when the pin is not found.
Most of the built-in K2 nodes will supply helper functions to get specific pins. e.g. UK2Node_CallFunction provides GetExecPin and GetThenPin which is the equivalent of calling UK2Node_CallFunction::FindPin(UEGraphSchema_K2::PN_Execute) and UK2Node_CallFunction::FindPin(UEdGraphSchema_K2::PN_Then) respectively.
void UK2Node_Print::ExpandNode(FKismetCompilerContext& CompilerContext, UEdGraph* SourceGraph)
{
    Super::ExpandNode(CompilerContext, SourceGraph);

    auto* FuncCallNode = CompilerContext.SpawnIntermediateNode<UK2Node_CallFunction>(this, SourceGraph);
    const FName CommandFuncName = GET_FUNCTION_NAME_CHECKED(UPrintBPFL, PrintWithVerbosity);
    FuncCallNode->FunctionReference.SetExternalMember(CommandFuncName, UPrintBPFL::StaticClass());
    FuncCallNode->AllocateDefaultPins();

    CompilerContext.MovePinLinksToIntermediate(*FindPinChecked(UEdGraphSchema_K2::PN_Execute), *FuncCallNode->GetExecPin());
    CompilerContext.MovePinLinksToIntermediate(*FindPinChecked(UEdGraphSchema_K2::PN_Then), *FuncCallNode->GetThenPin());
    CompilerContext.MovePinLinksToIntermediate(*FindPinChecked(FName("InString")), *FuncCallNode->FindPinChecked(FName("InString")));
    CompilerContext.MovePinLinksToIntermediate(*FindPinChecked(FName("InVerbosity")), *FuncCallNode->FindPinChecked(FName("InVerbosity")));
    CompilerContext.MovePinLinksToIntermediate(*FindPinChecked(FName("bPrintToScreen")), *FuncCallNode->FindPinChecked(FName("bPrintToScreen")));
    CompilerContext.MovePinLinksToIntermediate(*FindPinChecked(FName("bPrintToLog")), *FuncCallNode->FindPinChecked(FName("bPrintToLog")));
    CompilerContext.MovePinLinksToIntermediate(*FindPinChecked(FName("TextColor")), *FuncCallNode->FindPinChecked(FName("TextColor")));
    CompilerContext.MovePinLinksToIntermediate(*FindPinChecked(FName("Duration")), *FuncCallNode->FindPinChecked(FName("Duration")));
    CompilerContext.MovePinLinksToIntermediate(*FindPinChecked(FName("Key")), *FuncCallNode->FindPinChecked(FName("Key")));

    BreakAllNodeLinks();
}You have probably realised that we have repeated a lot of code here. We could easily create a lambda, member function or macro to help reduce a lot of the repetition which in turn reduces the complexity and make it less error prone, but I’ll leave that as an exercise for the reader.
We add BreakAllNodeLinks last which, as the name suggests, break all pin connections from our node completely isolating it. This means our node will eventually get pruned from the ubergraph leaving only the intermediates (assuming they were wired correctly).
Error Handling
UEdGraphSchema::TryCreateConnection returns a boolean to let us know whether the pins were successfully connected or not. We can get similar information from MovePinsLinksToIntermediate by calling CanSafeConnect on result which lets us know if the pins were able to be moved without breaking existing links on the intermediate node.
For complex node expansion it can be very difficult to keep track of what pins are supposed to be going to what and sometimes we might call TryCreateConnection or MovePinLinksToIntermediate on the wrong set of pins or some other scenario where either function fails so what do we do?
The simplest way to detect an error is to accumulate all the success results and check them at the end and show an error message on the node if it failed:
    bool bSuccess = true;
    bSuccess &= CompilerContext.MovePinLinksToIntermediate(*FindPinChecked(UEdGraphSchema_K2::PN_Execute), *FuncCallNode->GetExecPin()).CanSafeConnect();
    bSuccess &= CompilerContext.MovePinLinksToIntermediate(*FindPinChecked(UEdGraphSchema_K2::PN_Then), *FuncCallNode->GetThenPin()).CanSafeConnect();
    bSuccess &= CompilerContext.MovePinLinksToIntermediate(*FindPinChecked(FName("InString")), *FuncCallNode->FindPinChecked(FName("InString"))).CanSafeConnect();
    bSuccess &= CompilerContext.MovePinLinksToIntermediate(*FindPinChecked(FName("InVerbosity")), *FuncCallNode->FindPinChecked(FName("InVerbosity"))).CanSafeConnect();
    bSuccess &= CompilerContext.MovePinLinksToIntermediate(*FindPinChecked(FName("bPrintToScreen")), *FuncCallNode->FindPinChecked(FName("bPrintToScreen"))).CanSafeConnect();
    bSuccess &= CompilerContext.MovePinLinksToIntermediate(*FindPinChecked(FName("bPrintToLog")), *FuncCallNode->FindPinChecked(FName("bPrintToLog"))).CanSafeConnect();
    bSuccess &= CompilerContext.MovePinLinksToIntermediate(*FindPinChecked(FName("TextColor")), *FuncCallNode->FindPinChecked(FName("TextColor"))).CanSafeConnect();
    bSuccess &= CompilerContext.MovePinLinksToIntermediate(*FindPinChecked(FName("Duration")), *FuncCallNode->FindPinChecked(FName("Duration"))).CanSafeConnect();
    bSuccess &= CompilerContext.MovePinLinksToIntermediate(*FindPinChecked(FName("Key")), *FuncCallNode->FindPinChecked(FName("Key"))).CanSafeConnect();

    if (!bSuccess)
    {
        CompilerContext.MessageLog.Error(*NSLOCTEXT("UK2Node_Print", "InternalConnectionError", "@@: Internal connection error").ToString(), this);
}In the event of a wiring error the node itself will show an error banner with our message:
This is a great way of finding out if there is any errors but its very one dimensional since we have no idea which line caused the error or which pins were involved or why it failed.
The first is relatively trivial to solve by wrapping the call to MovePinLinksToIntermediate/TryCreateConnection with check/ensure which will also help you solve the second issue. The third issue can be dealt with by using FPinConnectionResponse returned by MovePinLinksToIntermediate and UEdGraphSchema::CanCreateConnection.
We can make a single macro to wrap all this up nicely:
#define MOVEPINS_SameName(Name, DestNode) { \
    auto* srcPin = FindPinChecked(Name); \
    auto* dstPin = DestNode->FindPinChecked(Name); \
    auto response = CompilerContext.MovePinLinksToIntermediate(*srcPin, *dstPin); \
    if (!ensureMsgf(response.CanSafeConnect(), TEXT("%s"), *response.Message.ToString())) \
        CompilerContext.MessageLog.Error(*FString::Printf(TEXT("@@: {0}"), *response.Message.ToString()), this); \
}

...

void UK2Node_Print::ExpandNode(FKismetCompilerContext& CompilerContext, UEdGraph* SourceGraph)
{
    Super::ExpandNode(CompilerContext, SourceGraph);

    auto* FuncCallNode = CompilerContext.SpawnIntermediateNode<UK2Node_CallFunction>(this, SourceGraph);
    const FName CommandFuncName = GET_FUNCTION_NAME_CHECKED(UPrintBPFL, PrintWithVerbosity);
    FuncCallNode->FunctionReference.SetExternalMember(CommandFuncName, UPrintBPFL::StaticClass());
    FuncCallNode->AllocateDefaultPins();

    MOVEPINS_SameName(UEdGraphSchema_K2::PN_Execute, FuncCallNode);
    MOVEPINS_SameName(UEdGraphSchema_K2::PN_Then, FuncCallNode);
    MOVEPINS_SameName(FName("InString"), FuncCallNode);
    MOVEPINS_SameName(FName("InVerbosity"), FuncCallNode);
    MOVEPINS_SameName(FName("bPrintToScreen"), FuncCallNode);
    MOVEPINS_SameName(FName("bPrintToLog"), FuncCallNode);
    MOVEPINS_SameName(FName("TextColor"), FuncCallNode);
    MOVEPINS_SameName(FName("Duration"), FuncCallNode);
    MOVEPINS_SameName(FName("Key"), FuncCallNode);

    BreakAllNodeLinks();
}With this macro if our connection is invalid we will get the red error banner on our node with the reason why it failed, as well as a breakpoint if we are debugging, and it will be in out log file which will even tell us the line that failed.
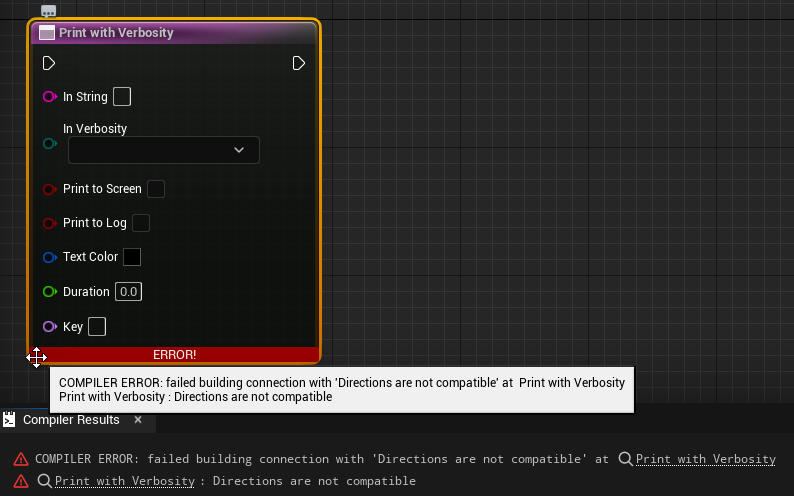
[2023.07.27-13.01.31:944][136]LogOutputDevice: Error: Ensure condition failed: response.CanSafeConnect() [File:...\{Project}\Source\{Project}Editor\Private\UK2Node_Print.cpp] [Line: 48]
Directions are not compatible
Finishing Touches
If you try to compile, you may be met with an error about '' being an invalid enumerant of EPrintLogVerbosity. This is because the default value for this pin is empty. If you change the value for InVerbosity this error will go away but this is a terrible user experience so lets put the finishing touches on our node.
In the following sections we will be operating on UEdGraphPin which is returned from CreatePin.
Pin Defaults
When we create a Print String node, it’s populated with some useful defaults and ours isnt. Luckily for us this is a pretty trivial fix. Pin defaults come in 3 types: FString, FText and UObject. For our node we will only be using the FString type which is accessible with UEdGraphPin::DefaultValue. You may notice that we only have 1 actual string pin, InString while the rest are … not. In order to set these defaults, we need string representations of the types for these pins. For InVerbosity its the name of the enum we want to use as the default and for everything else we will use either the ToString member function or LexToString.
Advanced Pins
Right now we have all of our pins visible all the time. This can be quite annoying since theres no way to hide them if we dont need to see them and the node takes up quite a bit of space. Luckily for us this is trivial to add. By default UEdGraphPin will hide advanced pins so inside of AllocateDefaultPins we just need to set AdvancedPinDisplay = ENodeAdvancedPins::Hidden; which will collapse the advanced view initially. For each pin that we want to be hidden with the advanced arrow, we just need to set UEdGraphPin::bAdvancedView = true;
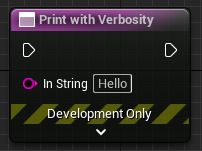
Development Only Banner
Debug/Development nodes like Print String show a Development Only banner. This effectively treats the node as “disabled” in non-editor builds and is enabled with SetEnabledState(ENodeEnabledState::DevelopmentOnly);.
Putting it Together
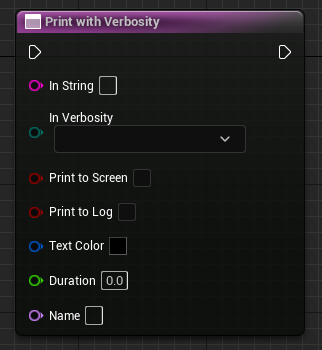
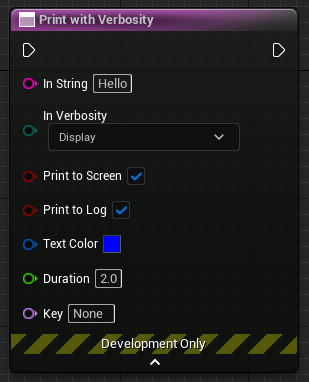
Everything combined leaves us with a custom K2 node that rivals Print String.
void UK2Node_Print::AllocateDefaultPins()
{
    SetEnabledState(ENodeEnabledState::DevelopmentOnly);
    AdvancedPinDisplay = ENodeAdvancedPins::Hidden;

    CreatePin(EGPD_Input, UEdGraphSchema_K2::PC_Exec, UEdGraphSchema_K2::PN_Execute);
    CreatePin(EGPD_Output, UEdGraphSchema_K2::PC_Exec, UEdGraphSchema_K2::PN_Then);

    CreatePin(EGPD_Input, UEdGraphSchema_K2::PC_String, "InString")->DefaultValue = TEXT("Hello");

    auto createAdvInputPin = [this](FName Category, FName Name, FString Default, UObject* Object = nullptr)
    {

        auto* pin = CreatePin(EGPD_Input, Category, Object, Name);
        pin->DefaultValue = Default;
        pin->bAdvancedView = true;
    };

    UEnum* VerbosityEnum = StaticEnum<EPrintLogVerbosity>();
    createAdvInputPin(UEdGraphSchema_K2::PC_Byte, "InVerbosity", VerbosityEnum->GetNameStringByIndex(3), VerbosityEnum);
    createAdvInputPin(UEdGraphSchema_K2::PC_Boolean, "bPrintToScreen", LexToString(true));
    createAdvInputPin(UEdGraphSchema_K2::PC_Boolean, "bPrintToLog", LexToString(true));
    createAdvInputPin(UEdGraphSchema_K2::PC_Struct, "TextColor", FLinearColor::Blue.ToString(), TBaseStructure<FLinearColor>::Get());
    createAdvInputPin(UEdGraphSchema_K2::PC_Real, "Duration", LexToString(2.0f));
    createAdvInputPin(UEdGraphSchema_K2::PC_Name, "Key", LexToString(NAME_None));
}
Examining Intermediates
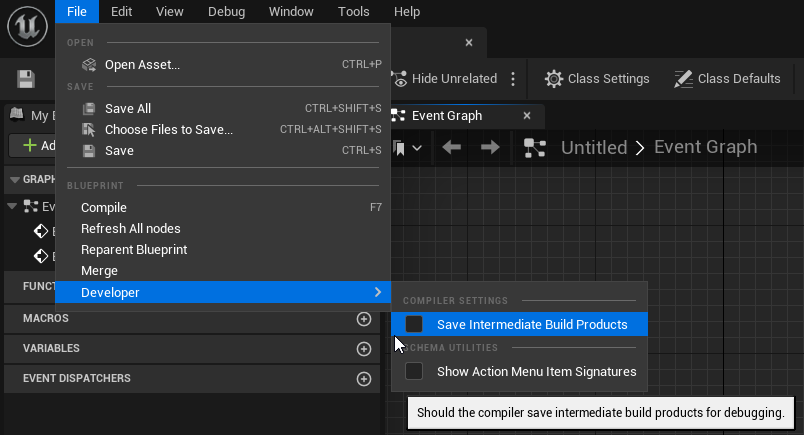
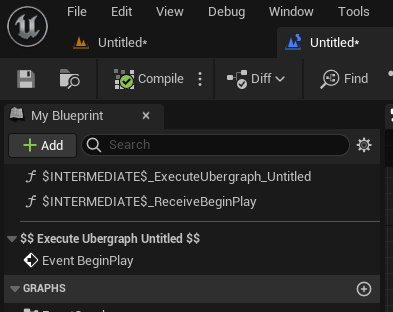
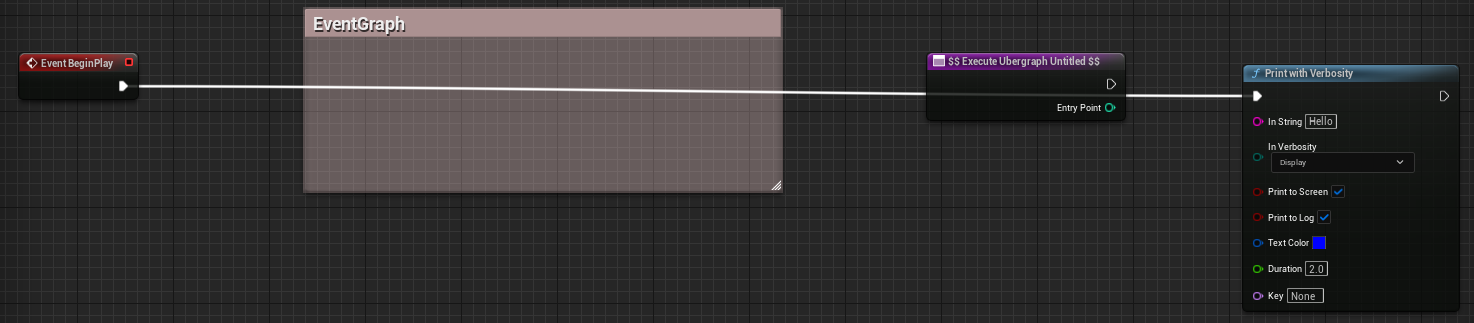
When implementing ExpandNode being able to see the abomination you have created is an invaluable tool. Just because it compiles doesnt mean what’s generated is what you intended. Unreal Engine has an option called Save Intermediate Build Products in each Blueprint located in File -> Developer. Enabling this option and compiling will give us access to all the generated graphs. Where your node is used will depend on which graph it appears in. Each function in the Blueprint will have its own graph and Ubergraph will contain the default EventGraph.
Wrapping Up
While this K2 node is basic it contains a lot of code which can be painful to maintain especially if it needs to be revisited later on. Being able to create K2 nodes is an excellent technical skill to have, however their application is quite limited and we could have skipped this entire node altogether if we removed BlueprintInternalUseOnly from PrintWithVerbosity and let the editor create the node for us with all the pins; and many other potential use cases for K2 nodes can be worked around by using Blueprint Macros and Blueprint Function Libraries.
The full code and working Unreal Engine 5 project for this article is available here
Special thanks to Daekesh for taking the time to proof this article.
In the next article we will be covering how to implement an async K2 node.